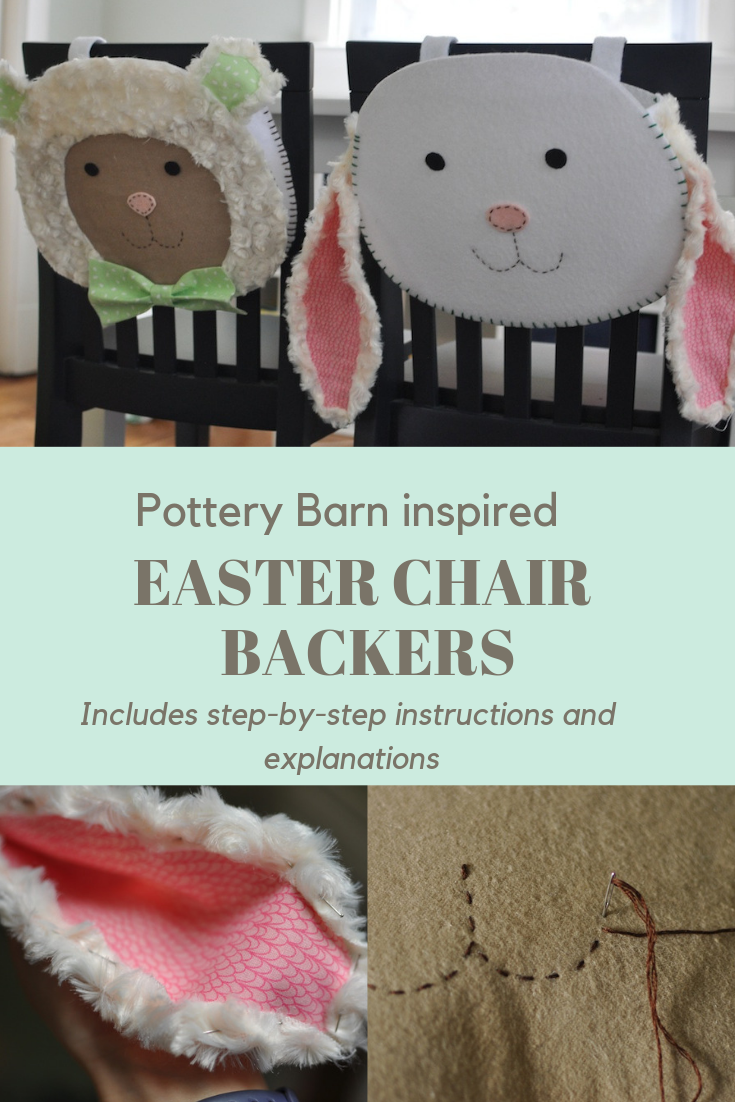
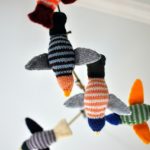
A few weeks ago my mom and I were cruising Pottery Barn Kids and we saw these chair backers, and my mom was like, “Oooh! Those are cute. I bet they’d be easy to make.”
Then we kept looking around and saw these and decided that maybe, just maybe, we could make them, too.
So I pinned it. And then, a week later, I went to Pottery Barn Kids and bought the backers to use as an example, then went to JoAnn Fabric and bought all the materials. And guess what? Pottery Barn, eat your heart out.

Actually, maybe Pottery Barn should be telling me to eat my heart out. I worked on the backers every moment David was asleep, about five hours a day from Sunday to Wednesday (20 hours total). My fingers are needle-pricked, there are scraps of materials all over my living room and I’ve been neglecting my husband. The kicker is: the PB backers cost $19 each (without a monogram) and I spent $45 at JoAnn Fabric. Ouch.
Part of the reason it was so expensive was because I over-bought fabric, but still. (And I think I can make more than one from what I bought.) This is a sentence I never thought I’d say, but: If you want to save yourself some money, just go to Pottery Barn.
To start, here are all my materials along with my Pottery Barn inspiration.

Supplies include: stiffened white felt for the front and back pieces, unstiffened white felt for the center piece, camel-colored material for the sheep face, pink and black felt for the nose and mouths, fuzzy material, buttons, fabric quarters for ears and bow ties, embroidery thread, tacky glue, and velcro.
I don’t have a sewing machine, so I bought glue for certain pieces. But that’s actually one reason we thought this would be simple: you don’t need a sewing machine.
I also looked around online and found this tutorial. She uses a sewing machine and her technique is a tad different, but it was still helpful.
Here’s my experience. I sort of figured everything out as I went, so this isn’t the only way to do it. That said, I hope I didn’t miss any steps.
1. Cut your pieces.
This was my mom’s suggestion. It might seem obvious to seasoned sewers like her, but to me this was critical advice.

Here are all my pieces cut and laid out. (Except the bow tie. I got super-excited and made the bow tie before taking the photo.)
I measured every single part with PB’s backers as my guide, not guessing or taking any creative license at all. Note: I used two pieces of stiffened felt, glued together, for the bunny face, one piece for the backs. For the sheep, I used one piece of stiffened felt covered with camel-colored cotton.
2. Iron!
Several of my pieces needed to be ironed — the material I used for the ears and bow tie, and the material for the sheep’s face. It makes things look so much better.
3. Start construction.
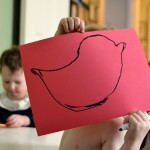
Several pieces need to be constructed — the ears, bow tie, and the faces. I embroidered the faces with three strands of brown embroidery thread.

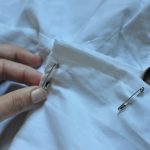
For the ears, I cut fuzzy material and the woven material, arranged and pinned the ears, and then…very carefully…glued it all in place.

For the nose and eyes, I embroidered the detail around the nose, then glued them all in place.
I had to keep the poor sheep bald for a while, but here he is all constructed before sewing. This might be one of the most important things to keep in mind: pay attention to when you should construct/add each piece. I attached the bunny ears last, but the sheep ears early on, because the sheep ears needed to be under the sheep fur.

And I didn’t attach the sheep fur until last (but I would put it on every now and then just to see what it’d look like).

4. Attach the straps
I attached my straps last, and I wish I hadn’t. It’s hard to work with them when everything is together.
For the straps, I cut two 12″ x 4″ pieces of unstiffened felt. I folded them and secured them with a quick running stitch, and some glue. Then I glued them to the back of the backer, and secured them with a quick tack.
I also sewed buttons for decoration, but straps connect with velcro (partially because velcro is easier than making a button hole, and also because little fingers can navigate velcro easier than buttons).
Here’s a strap from the bunny backer.

4. Start putting it all together…
I used a whip-stitch to attach everything. The stiffened felt faces, stitched to a strip of unstiffened felt. (The unstiffened felt is 22″ long, 4″ wide, then folded lengthwise, because one strip of felt seemed a little weak.)
If you’ve never done a whip stitch before, here are some clear instructions. I tried to keep my stitches even, but also (modeling off Pottery Barn’s example) pretty shallow and wide.


This is what the inside looks like — I think it’s pretty.

And here’s the back and front put together.

(At one point when I was sewing, Tom walked in and said, “So what is this you’re doing? Is this sewing or knitting?” I don’t expect him to know what a whip stitch is, but really? The guy makes sure to get our cars’ oil changed and tires rotated, so I guess knowing the difference between sewing and knitting is too much to ask.)
5. Finishing touches…
For these, after it was all sewn, I still needed to glue the sheep’s face fur, attach the bow tie and attach the bunny ears. For both pieces, I glued them first, then secured them with a few stitches.

Wow. 20 hours of blood, sweat and watching reruns on Hulu all boiled down to five easy steps.
The good news is: David loves them.

He checked both of them out, looked inside, and really liked them on his chairs.
(And they didn’t fall apart!)

The bad news? We aren’t planning to keep them. But don’t tell David, not yet.
I am planning to make more, but don’t tell Tom. He thinks that I’m done so, instead of sewing, I’ll actually talk to him during dinner again.


They turned out SEW cute!! 🙂 I’m impressed that David will leave them on the chairs. I don’t even want to think about the harm that would befall them in my house. 🙂
Really cute! Nice job. I’m with Jenny, if I was giving them away they would have to be hidden secretly away. My kids would rip them down then use them as special shoes to cross the freezing ice. Or something like that.
By the way, love how mom is still saying, “I could make that!”
you’re not keeping them? 🙁 I’m telling. Wait until I see David Andrew. I see I haven’t changed.
oh this is so fun! I especially love your husbands question, “Is this sewing or knitting?” haha! such a great idea! 🙂
ps- I just gave you a Liebster award on my blog. Check it out and play along! (please!)
Beautiful hand-stitching!!
These are so cute! I would never be able to make them. I’d like to include a photo from your post and a link to your article in my Easter ebook and a blog post series on GreenReset.com.
Even though you spent more, yours turned out super cute!!
[…] Easter Chair Backs by The Kriegers […]
Fascinating blog! Is your theme custom made or did you download it from somewhere?
A design like yours with a few simple adjustements would really make my blog jump out.
Please let me know where you got your theme. With thanks
Hi! I use the Blissful Theme on the Genesis Framework. You can find it here: http://my.studiopress.com/themes/
[…] is a wife and mom of two and lives in Richmond, Virginia. Amanda made these darling “Pottery Barn inspired Easter chair backers” and is sharing her complete tutorial with us. Thanks Amanda for sharing your talent with […]
awesome DYI; you recreations look just like the PB ones. Your son is adorable and I’m totally digging his plush bear hoodie. #RoundTuit
These are so cute!!!!!!
These look so great and much better than anything store bought. I too have been guilty of over-buying fabric based on my bulging fabric box! Great job though. Visiting from Lou Lou Girls.
Aww, these are too cute! I’ll have to remember for next year when I’ll have a little one at Easter. Thanks for joining us for the Wednesday Showcase!
These look super cute! I am always browsing through the PB magazines, and thinking how I can make something. I’ve made a couple of cute ideas from there in the past. And I’ve seen these dozens of times, including other holiday versions, and I’ve always wondered how to do a knock off. Thanks for linking up with us at The Wednesday Showcase!
These are awesome!! good job!!
These are so adorable. Sometimes the cost doesn’t do what we hoped it would, but you made them and you can’t put a price on that.
Thanks for sharing at Turn It Up Tuesday,
Bev
Lol1 If you want to save yourself money, go to pottery barn! Haha! But you’re right, you have so much leftover fabric, it is worth it, right??!
Thanks for sharing your link at the #HomeMattersParty !
Ahh, these are too cute! Thanks for linking up at Welcome Home Wednesdays! See you tomorrow!